Difference between revisions of "BioUML workbench installation"
From BioUML platform
m (→Installation) |
m (→Installation) |
||
| Line 22: | Line 22: | ||
#* Installation completed. Click '''Done'''. | #* Installation completed. Click '''Done'''. | ||
| − | For some methods of data analyses you also need to install [[R installation|R]] and [ | + | For some methods of data analyses you also need to install [[R installation|R]] and [http://www.bioconductor.org/ Bioconductor]. |
When the installation has been completed successfully, you can start the BioUML workbench. The BioUML setup wizard will help you to configure the BioUML workbench and install remote databases from the [[BioUML server]]. | When the installation has been completed successfully, you can start the BioUML workbench. The BioUML setup wizard will help you to configure the BioUML workbench and install remote databases from the [[BioUML server]]. | ||
Revision as of 19:07, 4 June 2013
| This page or section is a stub. Please add more information here! |
This page describes how to install BioUML workbench
Contents |
Prerequisites
Download
To download BioUML workbench you have to register on BioStore service. After registration and logging in you can find the BioUML workbench distribution in downloads area.
For more details read here.
Installation
- Make sure you have got JDK or JRE installed on your computer. Please note that starting from v. 0.9.3 the BioUML workbench requires JDK 6 or later and will not work with earlier versions of Java. You can download JDK 6 from the Sun Microsystems Inc website.
- Launch the BioUML workbench installer from the directory you saved it in during the download.
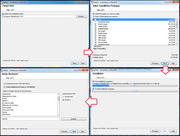
- The BioUML installer will guide you through the installation process. The installation process is straightforward and consists of 5 steps:
- Target path - specify the directory where the BioUML workbench will be installed.
- Select installation packages - here you can see a list of BioUML plug-ins to be installed. We recommend selecting all of the items (the default behaviour).
- Installation - the installation process is displayed in the progress bar of the window as the components are being installed. When the installation progress has reached 100%, click Next.
- Set up shortcuts - allows you to create shortcuts in the Start menu and on the desktop to launch the BioUML workbench.
- Installation completed. Click Done.
For some methods of data analyses you also need to install R and Bioconductor.
When the installation has been completed successfully, you can start the BioUML workbench. The BioUML setup wizard will help you to configure the BioUML workbench and install remote databases from the BioUML server.
Setup
| This page or section is under construction right now. |
Updates
BioUML workbench provides automatic updates of installed plug-ins by newer versions from the specified update server.
