Difference between revisions of "BioStore"
| Line 35: | Line 35: | ||
At this point resetting the password is recommended for your convenience. For that click on the '''Change the password''' option of the menu on the left, fill in the form that appears in the main pane and press '''Execute'''. | At this point resetting the password is recommended for your convenience. For that click on the '''Change the password''' option of the menu on the left, fill in the form that appears in the main pane and press '''Execute'''. | ||
| + | |||
| + | |||
| + | |||
| + | |||
| + | |||
| + | ==Creating BioUML projects via BioStore== | ||
| + | |||
| + | Users can create projects within the [[BioUML workbench]] or via BioStore. | ||
| + | [[File:Subscribing to a server.png|thumb|Subscribing to a BioUML server and (optionally) creating a new project]] | ||
| + | To subscribe to a server and create a project, go to '''Subscriptions''' page (''Main pane > Manage subscriptions'' or ''Menu > Shop > Subscriptions'') and press the '''Subscribe / Create project''' button. The '''Subscribe / create project''' form will appear in the main pane, where you are to: | ||
| + | * select from the dropdown list the name of the server subscription you’d like to start, | ||
| + | * enter your project name if necessary, and | ||
| + | * press '''Execute'''. | ||
| + | If the subscription procedure has been completed successfully, you will see the successful registration notification. | ||
| + | |||
| + | |||
| + | |||
| + | ==Inviting other users to your project== | ||
| + | |||
| + | Using BioStore, users can also invite other users to take part in their project(s) (if assigned the role of the administrator (GroupAdmin). | ||
| + | [[File:Inviting users to projects.png|thumb|Inviting a user to join a BioUML project]] | ||
| + | For that you have to: | ||
| + | * enter your BioStore account, | ||
| + | * select the '''Invite colleagues''' option on the main page - the invitation form will appear, | ||
| + | * type in your colleague’s e-mail address, | ||
| + | * select the proper group from the drop-down list. For each project you create a corresponding user group is displayed on the list of the '''Invite''' form ('''Group to invite user to''' field). You can invite your colleague to this or that group and they will gain access to your project associated with it. | ||
| + | * press '''Execute''' - Your colleague will receive the following e-mail: | ||
| + | |||
| + | ''Dear sir or madam!'' | ||
| + | |||
| + | ''Mr(s). <YOUR NAME> has invited you to register in the Biostore to participate in collaborative work within the group <PROJECT NAME>@<SERVER NAME>. To register, please visit https://bio-store.org/.'' | ||
| + | |||
| + | |||
| + | When your colleague registers, they will be automatically included into your group and the successful registration notification will be displayed to them. | ||
| + | If the user was already registered at the moment you invited them, they will be included into your group immediately. | ||
Revision as of 18:05, 11 April 2013
| This page or section is a stub. Please add more information here! |
BioStore is the central authentication and authorization server for all BioUML-related products. It's located on https://bio-store.org/. To get access to BioUML servers users have to register on the website first.
Contents |
Registration
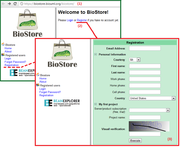
To register with BioStore you need to click on the Register link on the start page of BioStore and complete the registration form with personal details such as your email address, your name and country.
Along with the registration you can subscribe to a specific server handled by BioStore. The list of servers with free or trial subscription currently includes:
- BioUML on Amazon (free),
- Genex Server (free),
- Public geneXplain server (trial).
If you want your personal project to be created on the selected server, fill in the Project name field. However, you can always subscribe to the server or create a project later, after the registration, so you can skip this step if you’re not sure. After you complete all the required fields and press Execute, you will see the successful registration notification and a password to your BioStore account will be generated and sent to your email.
Starting work with your account
To start working with your account at BioStore go to the login dialog either by clicking on the appropriate link (Log in to BioStore...) in the successful registration notification right away or by choosing the Login option on the BioStore start page. In the Login dialog form enter your Username (the email address used during the registration) and the password that was sent to you by email. If you wish to stay signed in the system (so that you don't have to enter your username and password every time you visit BioStore), check Remember me box, then press Execute.
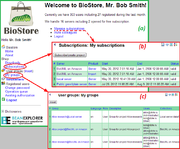
Once logged in to your account, you can see the main page consisting of the user menu pane (on the left) and the main pane.
Here you can view detailed information about your subscriptions to BioUML servers (Main pane > Manage subscriptions or Menu > Subscriptions > My subscriptions) or about your groups (Menu > Subscriptions > User groups > My groups), if any.
At this point resetting the password is recommended for your convenience. For that click on the Change the password option of the menu on the left, fill in the form that appears in the main pane and press Execute.
Creating BioUML projects via BioStore
Users can create projects within the BioUML workbench or via BioStore.
To subscribe to a server and create a project, go to Subscriptions page (Main pane > Manage subscriptions or Menu > Shop > Subscriptions) and press the Subscribe / Create project button. The Subscribe / create project form will appear in the main pane, where you are to:
- select from the dropdown list the name of the server subscription you’d like to start,
- enter your project name if necessary, and
- press Execute.
If the subscription procedure has been completed successfully, you will see the successful registration notification.
Inviting other users to your project
Using BioStore, users can also invite other users to take part in their project(s) (if assigned the role of the administrator (GroupAdmin).
For that you have to:
- enter your BioStore account,
- select the Invite colleagues option on the main page - the invitation form will appear,
- type in your colleague’s e-mail address,
- select the proper group from the drop-down list. For each project you create a corresponding user group is displayed on the list of the Invite form (Group to invite user to field). You can invite your colleague to this or that group and they will gain access to your project associated with it.
- press Execute - Your colleague will receive the following e-mail:
Dear sir or madam!
Mr(s). <YOUR NAME> has invited you to register in the Biostore to participate in collaborative work within the group <PROJECT NAME>@<SERVER NAME>. To register, please visit https://bio-store.org/.
When your colleague registers, they will be automatically included into your group and the successful registration notification will be displayed to them.
If the user was already registered at the moment you invited them, they will be included into your group immediately.


